
Over the years I’ve constructed four special tools to help me work on fuel injected Corvette engines. None of them are high tech, but they still save me a lot of time.
- Tool #1: Enrichment Stop Adjuster
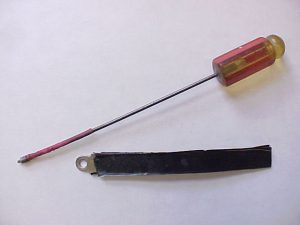
The most helpful tool I’ve built is a 3/32″ hex-head screwdriver with a flexible shaft. I use it to adjust the fuel meter enrichment lever stops while a unit is running. The Chevrolet shop manual implies I could use an ordinary 3/32″ Allen wrench (hex key) to change these screw settings. Riiiiiiight! Perhaps some people can do this easily with an L-shaped hex key, but I can’t do it without becoming extremely frustrated. There is very little room to work between the plenum and the fuel meter. I have to lay on top of the engine to see where to put the hex key. Even then, my stubby fingers can only rotate a stop screw an eighth turn at a time with a hex key.
The flex-shaft tool really shortens the time it takes me to recalibrate a fuel injection unit using a manometer. I no longer have to start and stop the engine multiple times while searching for the right setting on each screw. I can now insert this tool into a set-screw and just leave it there until that screw is properly set. The hex head will stay in the set-screw by itself, even with the engine vibrating. I use one hand to hold the throttle at ½” venturi vacuum while I make quick adjustments to the stop screw with the other hand. I can keep my eyes on the manometer the whole time.
-
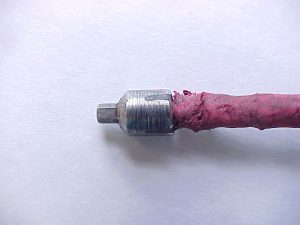
- I didn’t buy many new supplies to make this tool. I used a short section of old speedometer cable for the flex-shaft and the remains of a broken screwdriver for the handle. I also used the hex tip from a carburetor adjusting tool kit I bought for about $12. This kit is available from the Lisle Corporation under part number 55250 at CarQuest stores. It contains a flexible-shaft driver with four interchangeable heads. The adjusting tool supplied in the kit can’t be used on fuel injections because the shaft is too stiff to reach the set-screws. Also, the 3/32″ hex head is too long as furnished to maneuver into place. The head must be cut down to a much shorter length and then attached to a more flexible shaft such as the speedometer cable I used. This hex head is made from very tough steel. A Dremel tool or high-speed grinder must be used to cut it. A hack saw won’t work. I drilled a shallow hole in the back side of the shortened head in order to securely epoxy the cable tip. Probably any type of industrial-strength epoxy will do. I used the “J-B Weld” brand I found at the auto parts store. To protect the plenum from scratches when the tool is used, I enclosed part of the cable in heat-shrink tubing.
- Tool #2: Oil Line Wrench
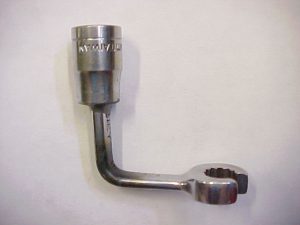
This tool is a custom-shaped wrench for removing the oil line going to the distributor. I started with a 3/8″ flare nut wrench. I shortened the handle and then bent it 90 degrees. Tool steel is impossible to bend cold, so I heated the handle cherry red with a cutting torch first. After the wrench cooled I glued the handle stub into an old 3/8″ drive socket with more J-B Weld epoxy. - Tool #3: Oil Seal Remover
Gene Dressen gets the credit for designing this tool as well as Tool #4. He described them in a Corvette Restorer article during the late seventies.
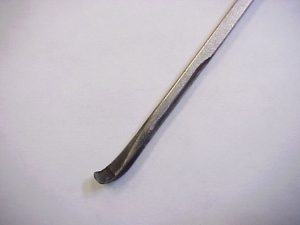
The distributor oil seal remover is just a screwdriver shaft with a reshaped blade. With it you can drive out oil seals from the backside. I made mine by using a Dremel tool with a cutoff wheel as a grinder. I removed the screwdriver handle because it was too soft to hammer, and then bent and recontoured the shaft tip so it would push squarely on the seal metal lip.
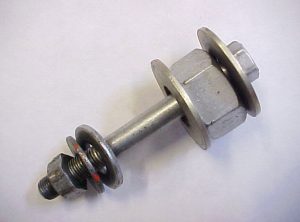
- Tool #4: Oil Seal Installer
This tool is a long bolt with several nuts and washers for pulling a distributor mainshaft oil seal into place. The large nut acts as a slip collar to protect the top of the distributor while the bolt and small nut are turned with wrenches.